
This chapter contains the following topics:
In Passport Business Solutions system security is established by creating a record for each authorized user and assigning one or more menu selections, defined as a custom menu, to each user. Each user will have access to only the Passport Business Solutions menu selections that are included in the user’s assigned menu.
This user’s access to the assigned menu is secured with a password. Passwords are unique in the Passport Business Solutions system and may not be shared except under strict control of the system administrator and even then may be changed by the user during login to PBS.
This chapter explains how to set up, modify, and maintain Passport Business Solutions custom menus for any Passport Business Solutions module. Individual menu selections, entire sub-menus and complete module menus can be easily enabled or disabled to create menus for your particular needs. After setting up a custom menu, it can be assigned to any number of users.
After you have set up a menu, in order for the menu restrictions to take effect, then you must assign the menu to a general user. If using one company in PBS, in the PBS Users chapter see User menus (button). If using multiple companies see Multi-company Access Menus.
If you want to print a list of users assigned to a menu and the custom selections defined for the menu. See Users Menu List.
Within Passport Business Solutions, a custom menu is defined as one or a group of individual menu selections.
For a simple example, an Accounts Payable clerk might be required to enter all company invoices as they are received. However this same clerk may not be permitted to actually post the vouchers that have been created.
In this case the clerk’s custom menu would allow access to the A/P Payables Enter and Edit list selections but would be denied access to the Payables Post selection.
Creating custom menus involves a process of choosing menu selections that will be a part of the custom menu. When you choose a menu selection to be a part of a custom menu, you enable it for the custom menu. When you choose not to include a menu selection as part of a custom menu, you disable if for the custom menu.
Menu selections that are enabled on the user’s custom menu will be displayed to user. Menu selections that are disabled on the user’s custom menu will not be displayed to user.
When you first install Passport Business Solutions, no custom menus have been defined for the system. If you plan to restrict user access using custom menus, you may decide to create the custom menus before you add users. You can create User IDs first, but you would need to modify their records later to update them with the appropriate custom Menu ID.
Restricting Reports Printed to Disk Access
For reports that have been printed to disk, there is an option that will restrict a user from accessing reports that the user can not run. For this feature to function, the Protect disk reports field in Company information must be set to Limit access by user menu / ID (set to Y in character mode). Click on the link above for more information.
Graphical Mode Menu Selections
Starting at the top left of graphical mode screens, menu selections are available . Most of these menu selections are the same from screen to screen and are accessible to every user. However, some menu selections are unique to a particular screen. Most of the unique selections are controlled by menu access. For example, the Valid G/L accounts entry screen has a menu selection called Print as circled here:
Accessing this selection displays a screen where the user can print the Valid G/L accounts report.
The set up of a custom menu selection determines whether the user can access a matching graphical mode menu selection. For example, if the custom menu does not allow access to the Valid G/L accounts report, then the menu selection is grayed out and not selectable as seen below:

Only users logged into the Passport Business Solutions system as Administrative users will have access to the Menu maintenance selection that is used to create custom menus.
|
Note |
If most of the selections in a module will be enabled for a custom menu, press <F1> when displayed to enable the entire menu for the module. Then use <F3> to disable the selections that will not be enabled for this custom menu. |
Select
Menu maintenance from the Setup menu.
Graphical Mode
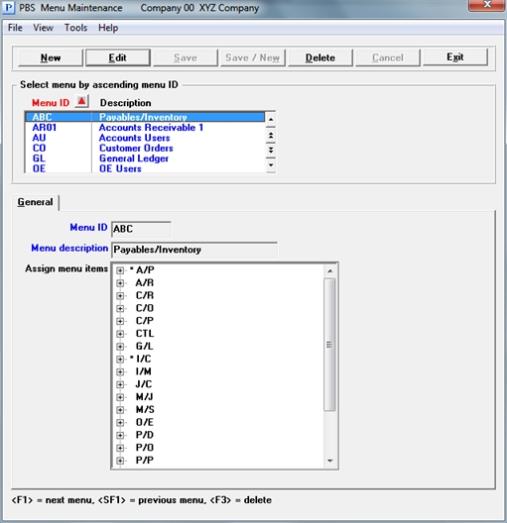
You may add, edit or delete menus on this screen.
The list box displays up to 6 menus at a time. You may sort the menus by menu ID in ascending or descending order. Click on the column name or the arrow to the right of the column name to change the sort or use the View options. Only column names in red may be sorted.
To locate a menu start typing the menu ID or use the arrow keys, <PgDn>/<PgUp>, and <Home>/<End> keys to find the order. The <F1> and <SF1> work the same as the arrow keys.
When a menu is found, to edit the record you may select <Enter>.
To access the buttons you may click on them with the mouse or use the Tab key for access. When the focus is on a key use the <Enter> key to select it. Keyboard equivalents are also available:
| Button | Keyboard | Description |
|---|---|---|
|
New |
Ctrl+n |
To enter a new menu. |
|
Edit |
Ctrl+e |
To edit an existing menu. |
|
Save |
Ctrl+s |
To save a new menu or changes to an existing menu. |
|
Save/New |
Ctrl+w |
This is a combination of the Save and New buttons. |
|
Delete |
Ctrl+d |
To delete an existing menu. You may also select <F3> to delete a menu.
If the menu has been assigned to a user, then you will not be able to delete it. |
|
Cancel |
Ctrl+c |
To cancel the addition of a menu or editing a menu. |
|
Exit |
Ctrl+x |
To exit to the menu. You may also use the <Esc> button. |
Character Mode
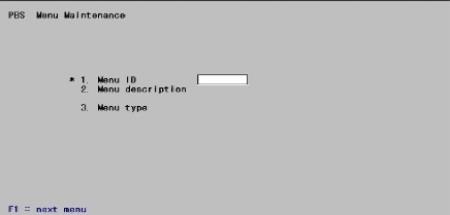
Enter the Menu ID that will be used for this custom menu. MENUFILE is not a valid entry as this Menu ID is reserved for the System menu.
|
Format |
Up to eight characters. This entry must begin with an alphabetic character. |
|
Example |
Type: APCLERK |
Options
You may also use one of the options:
|
<F1> |
For the next user |
|
<SF1> |
For the previous user |
Enter a description of the menu.
|
Format |
Up to 25 characters. |
|
Example |
Type AP Clerk Menu |
Character Mode
3. Menu type
This field only displays in character mode and only the Pull Down type menu is available. So this field automatically fills in with Pull Down and is skipped.
Make changes or press <Enter> to continue.
If you are working with an existing custom menu, you will be asked if you want to change the current menu selections.
Any change to menu selections?
Respond with Y or N.
If this is a new custom menu, the following screen will be displayed automatically when you press <Enter>.
***SCREEN***
Use this screen to define the selections that will appear on the custom menu. When you are done, press <Esc> to save the custom menu and return to the first screen.
If you attempt to exit this screen without enabling any selections you will be warned.
Menu empty. OK to delete this menu?
Answer Yes or No.
If you answer Yes, the current process will be halted and you will be returned to the first screen.
If you answer No, you will be allowed to continue defining the current custom menu.
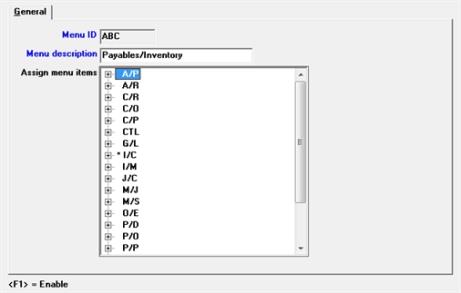
After adding a new custom Menu ID, you will be required to define the menu selections that will be enabled for this custom menu. The <F1> and the <F3> function keys are used to enable and disable menus selections, respectively, for a custom menu. A plus sign (+) will be displayed next to an enabled menu selection.
Entire menus or sub menus can be enabled or disabled using the <F1> and <F3> function keys.
|
Note |
The CTL Setup menu selections of User maintenance and Menu maintenance can only be accessed by a PBS Administrative user. So if you enable those menu selections for a general user, when the user attempts to access either selection, the message "This function is only available to administrators" displays and the user will be denied access. |
When navigating your menu and enabling and disabling menu selections, do so in the Assign menu items field on the General tab:
Graphical Mode
As you navigate the menu system, the prompt will change, providing reference to the current active menu. This cue is useful when enabling or disabling groups of menu selections. Even though this menu looks like the Tree-view menu, enabling or disabling menu selections will affect the menu no matter which type you are using.
|
Key |
Description |
|
<UpArrow> |
Use this key to move the focus to the previous menu selection. The screen will automatically scroll if the previous selection is not currently displayed. |
|
<DownArrow> |
Use this key to move the focus to the next menu selection. The screen will automatically scroll if the next selection is not currently displayed. |
|
<PgUp> |
Use this key to navigate to the previous group of menu selections. |
|
<PgDn> |
Use this key to navigate to the next group of menu selections. |
|
<RightArrow> |
When a + sign displays, use this key to expand the menu. |
|
<LeftArrow> |
When a - sign displays, use this key to contract the menu. |
Character Mode
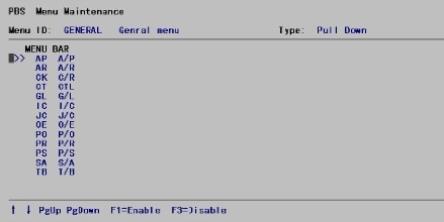
When you first enter the menu screen, the words MENU BAR will be displayed above the cursor. As you navigate the menu system, this prompt will change, providing reference to the position of the cursor and the current active menu. This cue is useful when enabling or disabling groups of menu selections.
|
Key |
Description |
|
<UpArrow> |
Use this key to move the cursor to the previous menu selection. The screen will automatically scroll if the previous selection is not currently displayed. |
|
<DownArrow> |
Use this key to move the cursor to the next menu selection. The screen will automatically scroll if the next selection is not currently displayed. |
|
<PgUp> |
Use this key to navigate to the previous page of menu selections. |
|
<PgDn> |
Use this key to navigate to the next page of menu selections. |
|
<Enter> |
If MENU BAR is displayed as the current menu or the cursor is positioned on a sub menu, use this key to expand the menu. |
|
<Esc> |
If MENU BAR is displayed, use this key to exit the screen. Otherwise, use this key to escape to a higher level menu. |
Menu selections may be added or changed during an update or upgrade of PBS. When this occurs these new selections will not be available to general users who have been assigned a menu. If you require that your user have access to the new menu selection, you must go into Menu maintenance and assign this selection following the installation.